Foodie Quine - Edible Scottish Adventures: Halloween

Showing posts with label Halloween. Show all posts

Spooky Halloween Fudge

Thursday, 17 October 2019
With only two ingredients (plus spooky toppings) and no tricky temperatures or boiling hot sugar required, this microwave Halloween Fudge is quick and easy to make. The ideal sweet treat for trick and treaters this Halloween and great fun to make with the kids.


I couldn't let Halloween go past without posting a version of two ingredient fudge. It's previous incarnations for Christmas, Valentines and Easter have all been really popular so it was time for a spooky variation. With only two ingredients, no tricky temperatures or boiling hot sugar required, microwave fudge is quick and easy to make. Once you’ve mastered it you can adapt the toppings to suit the occasion and personal preference. You can make it with white, milk or dark chocolate. I use supermarket own brand which works just fine. More expensive chocolate may be even better, I just haven’t tried it! You can also make it in a bowl over boiling water if you don’t have a microwave.

Maple Cinnamon Spiced Roasted Pumpkin Seeds

Tuesday, 30 October 2018
Don't discard your pumpkin seeds this Halloween! Those slippery little suckers that usually end up in the compost bin are just a couple of steps away from a delicious snack – crunchy, flavoursome and oh so moreish. Roasted with butter, cinnamon and maple syrup they become an autumnal taste sensation that you just can't get enough of. 


Hopefully by now I've harped on enough about using pumpkin for both carving and eating that you know my thoughts on the matter. #lovefoodhatewaste There is so much more potential within them that just a spooky face and a tea light. To clear up any further misconceptions you absolutely CAN eat the flesh of supermarket carving pumpkins, you perhaps won't get as much as from a culinary pumpkin but certainly enough for a pot of pumpkin soup or a loaf of pumpkin bread. But today's recipe isn't about pumpkin flesh, instead it's focusing upon another discarded element - pumpkin seeds.

Pumpkin Soda Bread

Sunday, 28 October 2018
A quick and easy Autumnal Pumpkin Soda Bread that requires no yeast, kneading or proving. A perfect love food hate waste recipe to use up pumpkin flesh before you carve your Jack-O-Lantern. We really do need to realise that pumpkins are a valuable source of food and not just for decoration.


The second of my pumpkin recipes for 2018 urging you to eat as well as carve these wonderful orange fruits! (yes they are fruits not vegetables) I'm really delighted that my post about where to pick a pumpkin in Scotland has proved to be so popular. I'm pretty sure that the vast majority of the places featured have now sold out so please do double check before any last minute journeys to procure pumpkins. A sheet with a selection of my pumpkin recipes was available to visitors at Udny, Arnprior, Kilduff and Westerton Pumpkins and Pumpkin Soda Bread was one of the recipes included so I'm hopefull that some pumpkin pickers may already have given it a try. 


Pumpkin and Chorizio Soup

Tuesday, 23 October 2018
Soup is possibly the quickest and easiest way to make use of pumpkin flesh and this one is super tasty. Sweet pumpkin and spicy chorizio are a winning combination and this warming soup is packed with intense flavours. A hug in a bowl Ideal for Halloween and Bonfire Night.


'Tis the season for Pumpkins. I've said it before I'd I'll keep saying it but we really do need to realise that pumpkins are a valuable source of food and not just for decoration. There’s more than enough flesh to do both. 1.8 million pumpkins were carved in Scotland for Halloween last year with over 1.1 million thrown away. That’s enough pumpkins to stretch from Edinburgh to Stornoway. A truly frightening amount of food waste. 


Scottish Pumpkin Patches 2018

Wednesday, 10 October 2018
A comprehensive roundup of the best places to pick pumpkins in Scotland this Halloween. Fun for all the family at locations in Aberdeenshire, Fife, Angus, Perthshire, the Lothians and Stirling. Keep with tradition and choose a neep, get lost in a maze, meet farm animals, dig tatties, clamber on bales and lots more. Grab your wellies and warm clothes this Autumn and experience a Scottish Pumpkin Patch.


Halloween has changed a lot since I was wee. Then it was all about homemade costumes, neeps, apple dooking, guising and not a mention of trick or treating and pumpkins. You had to do a proper turn to get your sweetie. A joke would have had the door slammed on your face. However in recent years I too have turned to the dark side and officially become obsessed with all things pumpkin, fall, autumnal, thanksgiving and pumpkin spice! I do still however bow down before anyone who attempts to carve a neep. Those bad boys are seriously hard work. Simplistic carving is the order of the day and it takes time and dedication to create a neepie lantern. Saying that, the smell of a stubby candle burning the inside of a neep is a childhood memory I would rather forget. The examples below are from Mandy at Mud Pies and Isla at Cool Gourmet. I look forward to seeing what both ladies come up with this year.

Jack Skellington Pumpkin King Quesadillas

Saturday, 28 October 2017
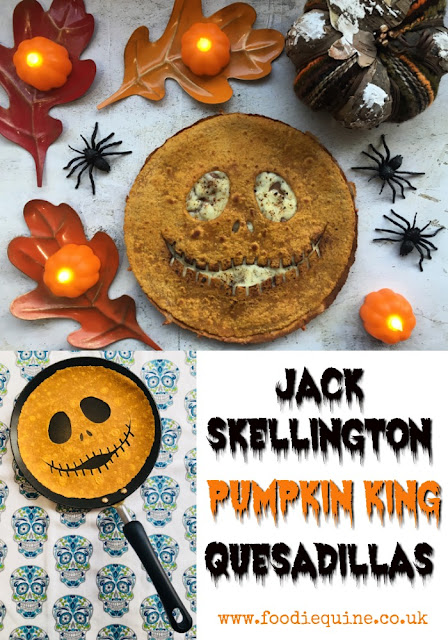
Celebrate Halloween, Dia de los Muertos (or Christmas?) with the Pumpkin King himself. The one and only Jack Skellington. Quick and easy to make but SO effective these Vegetarian Mexican Quesadillas are sure to be a spooky sensation.


I feel like I'm running out of time. Halloween is looming and I still have recipes that I want to share with you. Admittedly some of them are still in my head but some have actually been made, eaten and photographed. Today's Jack Skellington Pumpkin King Quesadilla is more of an idea than a full blown recipe but I'm so chuffed with how he turned out that I'm going to share how I made him. No need to make it like Jack - you could easily carve out whatever you like on your Quesadilla - just like you would on a real life Pumpkin. He would also work really well for any Dia de los Muertos - Day of the Dead celebrations. 


There's always a wee bit of discussion in this house as to whether The Nightmare Before Christmas is a Halloween or Christmas Movie. I reckon it counts as both. If for some reason you have absolutely no idea who Jack Skellington is then I'm afraid we can no longer be friends. Seriously if you don't know it, do check out the 1993 film. Quick synopsis is that Jack is to Halloween what the Easter Bunny is to Easter and Santa to Christmas. As the Pumpkin King he's MC for Halloween Towns annual celebrations however he's becoming somewhat depressed about his role and decides that instead he'd like to be Sandy Claws. Cue much shenanigans including bogeymen, unrequited love and mortal peril but it all works out for the best in the end.


I used Sweet Potato tortilla wraps to make Jack but you could easily use standard ones. I've also recently spotted fantastically coloured Beetroot and Spinach wraps in the supermarket which would also work really well for this. To make Jack I used a Jack Skellington Stencil from Pinterest. I had to scale the size down a wee bit on my printer/copier to get it to fit on the wrap and then cut out the shape using a combination of knife and scissors. There are loads of great pumpkin stencils out there which you could use or just go freehand. 


In addition to my Jack Skellington Pumpkin King Quesadilla 'recipe' I'm also going to take the opportunity to re-share some of my other Halloween recipes with you. Please do tag me @foodiequine or #foodiequine if you make and share on social media. 

www.foodiequine.co.uk Seven Spooky Halloween and Pumpkin Recipes. Pumpkin Pasties, Peanut Butter Ghosts, Traditional Toffee Apples, Pumpkin & Goat Cheese Tart, Pumpkin, Cauliflower & Chickpea Korma, Spooky Chocolate Candy Bark, Jack Skellington Pumpkin King Quesadillas.

Jack Skellington Pumpkin King Quesadillas

Tortilla Wraps (I used Sweet Potato, plain, Spinach or Beetroot would also work really well)
Refried Beans
Grated Mozzarella
Smoked Paprika and/or Chilli Flakes
To serve - tomato salsa, jalapenos and soured cream. 

Cut out Jack Skellington's face from your tortilla wrap (see instructions & template above)
Dry fry 'Jack' on both sides in a frying pan - a crepe pan works well for this - until crispy.
Set aside and dry fry a second wrap.
Warm through the refried beans in the microwave.
Spread the refried beans over the uncut wrap and top with a generous handful of grated Mozzarella.
Sprinkle with smoked paprika and/or chilli flakes to taste.
Melt the cheese under a preheated grill and top with the 'Jack' tortilla to make a Quesadilla.
Serve accompanied with tomato salsa, jalapenos and soured cream.


♥ Pin me for later...
www.foodiequine.co.uk Celebrate Halloween, Dia de los Muertos (or Christmas?) with the Pumpkin King himself. Jack Skellington! Quick and easy to make but SO effective these Vegetarian Mexican Quesadillas are sure to be a spooky sensation.

Butternut Squash, Cauliflower and Chickpea Korma

Wednesday, 25 October 2017
Veggie curry has never tasted so good. Vegan and Gluten Free this recipe is perfect for using seasonal Pumpkin innards - we need to realise that pumpkins are a valuable source of food and not just for decoration. It can also be made year round using fresh or frozen butternut squash. 


It's pumpkin season, possibly my favourite time of the year. Despite my Scottish upbringing and Halloween being all about Neep Lanterns and Guising I've fallen hook line and sinker for Fall. My home is currently adorned with autumnal and pumpkin decor of all shapes, sizes and types. I've got cushions, candles, wreaths, garlands, plates, mugs and more. Pumpkin spice and everything nice, that's what Autumn is made of! This time last year we were on holiday in Orlando and needless to say lots of autumnal bits and pieces came home in my suitcase. You can read all about it my Pumpkin Pasties and the Wizarding World of Harry Potter post. Of course this time of year is also the perfect excuse to unearth my rather amazing Staub pumpkin cast iron cocotte. Isn't she just lovely?


Sadly there is a scary amount of Pumpkin waste at this time of year. We need to realise that pumpkins are a valuable source of food and not just for decoration. 1.8 million pumpkins were carved in Scotland for Halloween last year with over 1.1 million thrown away. That’s enough pumpkins to stretch from Edinburgh to Stornoway - a frightful amount of food waste. Seven out of ten pumpkins carved for Halloween didn’t get eaten, please don't let yours be one. The recipe I'm sharing today is actually one that I make all year round using butternut squash but works equally well using the innards of a Pumpkin that you're going to be carving. Butternut Squash is a bit of a nightmare to prep so for year round convenience I've taken to buying bags of it frozen. Peeled, deseeded and chopped you can chuck it straight into a roasting tin or casserole.


Using frozen squash alongside frozen cauliflower and onions this becomes a quick store cupboard meal as I've always got coconut milk and cream to hand. It's also accidentally vegan and gluten free which I only actually realised after the first couple of times that I made it! I've tweaked the recipe to add additional texture with chickpeas and toasted almonds to avoid it being too mushy and I reckon it's pretty much the perfect veggie curry served up alongside some brown rice. If you have them available spinach and/or kale also make great additions. Of course you can pimp up the spice content to suit yourself. I'm a mild and creamy girl when it comes to curry. Ain't no Pumpkin Vindaloo going to get past these lips!


Pumpkin (Butternut Squash), Cauliflower and Chickpea Korma - Vegan & GF

Splash of Rapeseed or Vegetable Oil
1 Onion, diced
2 cloves Garlic, crushed
1 Tsp Cumin
1 Tsp Coriander
2 Tsp Turmeric
1 Tsp Salt
1/2 Tsp Ground Black Pepper
50g sachet of Coconut Cream
500g Squash or Pumpkin, cubed
400ml tin Coconut Milk
500g (or 1 head) Cauliflower, broken into florettes
400g tin Chickpeas, drained
25g Toasted flaked Almonds
Chopped Fresh Coriander to garnish


Heat the oil in a large heavy based pan/casserole and cook the onion and garlic over a low heat for 10 minutes or until soft and lightly golden.
Add the cumin, coriander, turmeric, salt and pepper and cook out for a couple of minutes before adding the sachet of coconut cream and allowing it to melt down.
Pour in the Coconut Milk and add the cubed Pumpkin or Squash, turn up the heat, bring to the boil and then pop the lid on and reduce to a simmer.
Cook for 15 minutes before adding the cauliflower florets.
After a further 15 minutes check to see that both the pumpkin and cauliflower are tender (if not allow extra time) add the chickpeas and warm through.
Serve topped with the toasted almonds and chopped fresh coriander.


For further ideas of how to use up your Pumpkin innards check out the following recipes from some of my fellow food bloggers and join the Love Food Hate Waste pumpkin rescue trail this Halloween.


♥ Pin me for later...


www.foodiequine.co.uk Veggie curry has never tasted so good. Vegan and Gluten Free this recipe is perfect for using seasonal Pumpkin innards - we need to realise that pumpkins are a valuable source of food and not just for decoration. It can also be made year round using fresh or frozen butternut squash.

Squash and Goats Cheese Tart

Wednesday, 9 November 2016

There's no denying that we're now in Autumn, both Halloween and Bonfire Night have been and gone, the clocks have fallen back and the leaves have turned. 'Tis indeed the season of mists and mellow fruitfulness. I reckon that those Danes and their Hygge may just be on to something. It's definitely time for hunkering down and cosying up with some comfort food. When we think of the changes in how we eat at this time of year it's most often soups and stews that spring to mind. However the Autumn brings with it a bountiful harvest of seasonal Cucurbita. No idea what I'm on about? Cucurbita is the Latin word for gourd which encompasses squash and pumpkins. Sadly there is a scary amount of Pumpkin waste at this time of year. Recent research found that two in five British households carve pumpkins for Halloween with most of these opting for at least two pumpkins, however only 33% cook the edible pumpkin that they carve out. We need to realise that pumpkins are a valuable source of food and not just for decoration. 


Despite their proliferation in the supermarket for Halloween it can be hard to find them at any other time, however Butternut Squash are available all year round and in the last couple of years I've been delighted to spot a selection of the smaller more colourful and unusually shaped pumpkins throughout the Autumn. Today I've teamed squash with herbs and goats cheese for a fantastic vegetarian tart. I used a Jamie Oliver 25cm Loose base quiche tin to bake it in and the result is rather stunning if I do say so myself. The sides of the tin are higher than standard and the depth of the flutes gives a very professional finish. Made from carbon steel, rolled edges provide added strength and resistance from warping. There's a 25 year product guarantee and a 5 year non-stick coating guarantee and to top it off a gorgeous duck egg blue colour which matches my kitchen perfectly!


When it comes to shortcrust pastry for a tart or quiche nine times out of ten I'll use shop bought. Are you shocked?! To be honest I'd rather spend my time making a fab filling than faffing around with pastry. However I do have a few top tips to share that will help you line a tart tin whether you make your own or use ready made.

  • Roll out your pastry to the thickness of a £1 coin. I find ready rolled a wee bit too thick for my liking so never use it straight from the pack.
  • Keep things cool. Cold hands make the best pastry.
  • Transfer the pastry to the tin by draping it over a rolling pin.
  • Push but don't stretch the pastry into shape.
  • Use a spare piece of well floured pastry, rather than your fingers, to push the pastry down into the corners and up the sides.
  • No ceramic baking beans? Use pulses or pasta, just don't try to cook with them afterwards!
  • Where time allows rest the pastry for 30 minutes in the fridge before baking.
  • Place your tart tin on a sturdy baking tray that won't buckle in the oven.
  • Bake your pastry blind before you trim off the edges to avoid shrinkage. 
  • Run a rolling pin lightly over the top in both directions to trim off the excess pastry.

Armed with my top tips you'll be all set to create a showstopper of an Autumnal Tart! The only thing I'm slightly worried about is that I vividly remember being told in my Home Economics lessons that you should use a plain tart tin for savoury bakes and fluted for sweet. Perhaps I'm breaking a cardinal culinary rule?!


Autumnal Squash & Goats Cheese Tart


750g Squash (Pumpkin or Butternut Squash)

2 Tbsp Garlic Rapeseed Oil (or Oil and a couple of cloves of Garlic)

Salt & Pepper

3 Sprigs Fresh Thyme

3 Sprigs Fresh Rosemary

375g Shortcrust Pastry

200g Goats Cheese with Rhind

2 Free Range Eggs
200ml Single Cream
Handful of Pumpkin Seeds

Preheat the oven to 200c
Peel, de-seed and cube your pumpkin or squash and place it in a roasting tin along with the Garlic Oil, freshly ground Salt and Pepper, Thyme and Rosemary.
Roast for 30 minutes, tossing halfway through.
Remove any large thyme/rosemary stalks and the garlic cloves (if used).
Line a 25cm Loose Base Quiche Tin with the shortcrust pastry. Bake blind for 10 minutes before removing the greaseproof paper and beans and continuing to bake for a further 5 minutes. 
Cut the goats cheese into cubes and arrange in the blind baked pastry case along with the roasted pumpkin/squash.
Lightly beat the eggs, season with salt and pepper and combine with the cream.
Pour the egg mix over the squash and cheese and sprinkle with pumpkin seeds.
Reduce the heat on the oven to 180c and cook the tart for 20-25 minutes or until the top is golden brown and the egg mix has set.


For more Vegetarian quiche and tart ideas check out Cathy's Spinach, Pea and Spring Onion Flan, Chris's Goats Cheese Tart with Mint Choclette's Three Allium Smoked Chilli Tart, Janice's Pea, Mint and Goats Cheese Quiche and my Greek Spanakopita Pie.


♥ Pin me for later...
www.foodiequine.co.uk Vegetarian Tart with Autumnal Pumpkin or Squash with Goats Cheese, Herbs and Pumpkin Seeds. Perfect for Halloween and Fall.


Disclosure : This is a commissioned post for Jamie Oliver Bakeware. 
As always, all views expressed are my own. 
Thank you for supporting the brands who make it possible for me as a passionate Scottish Food Blogger to continue to share my Edible Food and Travel Adventures with you. I’m super choosy who I work with and promise to bring you only the cream of the crop.

Pumpkin Pasties and the Wizarding World of Harry Potter

Sunday, 30 October 2016
Celebrate Halloween or Harry Potter and Hogwarts with these quick and easy to make Pumpkin Pasties using canned Pumpkin and my Pumpkin Spice Mix. 


One week on and our fortnight's holiday in Orlando now seems but a distant memory. Suffice to say that we had a fantastic time when we finally got there. Hurricane Matthew intervened so we got an unintentional mini break in New York! You can read more about what we got up to in my What to Eat in New York City post. 


Whilst many head to Florida for Disney, much of our excitement was about a wizard called Harry rather than a mouse called Mickey. The Wizarding World of Harry Potter is spread across the two Universal theme parks with Hogsmede and Hogwarts in Islands of Adventure and Diagon Alley at Universal Studios.


We've already been to the W.B. Studio Tour in London and were blown away by the recreation of Diagon Alley there, but Universal have taken the construction of the Wizarding World of Harry Potter to a whole new level. The attention to detail is simply amazing. You could literally just wander around for days and still not see everything that there is to see and that's without going on the rides. It's a Potterheads idea of heaven! There's a headline ride in each park 'Escape from Gringotts' in Universal Studios Florida and 'The Forbidden Journey' in Islands of Adventure. There's no fastpass queue for any of the rides but in all honesty the queueing is a huge part of the whole experience as you encounter the Goblins in Gringots, the Sorting Hat, the Mirror of Erised, talking portraits, Dumbledore's Office, the Griffindor Common Room and much more. There's also a 'tour only' line so you can head back with your camera and explore all the detail at your leisure. Both rides are truly wonderful totally immersive experiences.


Stepping on board at Kings Cross at the infamous Platform 9¾ or at Hogsmede Station you can make the magical journey on the Hogwarts Express between the two parks. Be sure to travel in both directions as the experience is different for each. There's a wonderful optical illusion moment as you board and walk straight through a solid brick wall. All the famous shops and establishments are present in all their glory. Weasleys’ Wizard Wheezes, Madam Malkin’s Robes for All Occasions, Dervish and Banges, The Magical Menagerie, Wiseacre’s Wizarding Equipment and Quality Quidditch Supplies. If the Dark Arts are your thing you'll find everything you need down the gloomy Knockturn Alley, including Borgin and Burkes. You can of course purchase your own wand in Olivanders where each wand is waiting to choose it's wizard, albeit at a considerable price! $$$


No visit would be complete without stopping for refreshments at The Three Broomsticks or The Leaky Cauldron. Sweet treats a plenty in Hogsmedes legendary Honeydukes - chocolate frogs, Cauldron Cakes, Treacle Fudge, Fizzing Whizzbees and of course Bertie Bott’s Every-Flavour Beans. (I did a live Facebook video from Honeydukes which you can watch here) Florean Fortescue’s Ice-Cream Parlour provides icy treats in Diagon Alley where I opted for a Peanut Butter and Strawberry Ice Cream Sundae. 


The main event for any fan is of course tasting Butterbeer. I'd tried it when we did the London studios tour and really didn't enjoy it at all. However I'm not sure if they've changed the recipe or if it tasted better in the sunshine but I liked it much more this time round. You can get it in traditional or frozen form and with or without a foamy head. I was super excited to try Pumpkin Juice and it didn't let me down. Way better than I had expected and such a gorgeous bottle. A Pumpkin Pastie was also on my to eat list. I'd expected them to be savoury but they were sweet like Pumpkin Pie. Whilst they were fresh in my mind and to coincide with Halloween I decided to have a go at making my own. 


I actually struggled to track down the Canned Pumpkin for the recipe. It seems to be on sale in larger supermarkets from the Central Belt southwards but alas does not appear to have made it onto the shelves in the North of Scotland. Luckily a Canadian friend who orders it in bulk online stepped in and saved the day with a can. I owe you big time Julia! I used a pumpkin shaped cookie cutter to make mini pasties but they went a wee bit out of shape so a traditional pastie might be better and would allow the inclusion of more filling, which is always a good thing. 

“Hungry, are you?”
“Starving,” said Harry, taking a large bite out of a Pumpkin Pasty.

Harry Potter and the Philosophers Stone


Pumpkin Pasties

375g Shortcrust Pastry (no shame in shop bought - that's what I used!)
200g Canned Pumpkin (approx half a can)
2 tsp Pumpkin Spice
75g Caster Sugar
Milk to glaze

Preheat your oven to 190c
Roll out the pastry until its 1/16" thick and cut out out Pumpkin shapes and place them on a greased/lined baking sheet.
Mix together the pumpkin, pumpkin spice and sugar. You can adjust the quantities to your own taste.
Put a teaspoonful of pumpkin mix in the middle of each pastry pumpkin. Brush around the edges with milk and place a second pastry pumpkin over the top.
Seal the edges of the pumpkins with a fork.
Glaze the pumpkins with milk and sprinkle the tops with a little castor sugar combined with pumpkin spice.
Bake for 25 minutes or until golden brown.

You can use shop bough Pumpkin Spice Mix or make your own. I used the following recipe. The excess can be stored in a spice jar.


Pumpkin Spice Mix 
3 tablespoons ground cinnamon
2 teaspoons ground ginger
2 teaspoons ground nutmeg
1 ½ teaspoons ground allspice


Witchcraft & Wizardry Pumpkin carving by Foodie Loon
For further Harry Potter food inspiration be sure to check out my recipe for Treacle Tart, Lisa's for Hagrid's Rock Cakes and Grace's wonderful Harry Potter themed Lunch Box which includes Edible Broomsticks, Babybel Owls and Wizard Hat Sandwiches. 


♥ Pin me for later...
www.foodiequine.co.uk Celebrate Halloween or Harry Potter and Hogwarts with these quick and easy to make Pumpkin Pasties using canned Pumpkin and my Pumpkin Spice Mix. Plus a roundup of our visit to The Wizarding World of Harry Potter at Universal Studios.

Halloween Chocolate Candy Bark

Friday, 28 October 2016
Spooky Halloween Chocolate Candy Bark. This no bake treat literally takes minutes to make but is such fun and really effective. Perfect for Trick or Treaters - It's Bark is worse than its Bite!


Boo! Tis the season of tricks and treats so I'm sneaking in with another quick no bake treat for Halloween. Hopefully you've already seen my oh so cute Peanut Butter Ghosts? Today's very loose 'recipe' is even simpler. It's more of a general idea and there are plenty of variations of it all over the interweb but this is the first time I've made some so I though I'd share what I did and how I did it. We were in Orlando for the October Holidays and everything was full on Halloween. I finally had my first taste of Candy Corn! Not as I expected at all, very much like fudge and no crisp shell which I'd always imagined it to have. Alas I never took any home with me as I ate a huge tub there and couldn't trust myself with buying more, so unfortunately it doesn't make an appearance on my bark.


The sweets I have used are Spooky Colours Peanut M&M's, Randoms Halloween Spooky Mix and Edible Eyes. I also used some black & orange Halloween sprinkles and some red Christmas sprinkles. Red/orange/green coloured chocolate or candy melts would also be really effective as would those gummy teeth. To be honest pretty much anything slightly spooky goes! The US versions all seem to include cookies and/or pretzels so you could go down that route too or perhaps go more rocky road and add marshmallows. Scary has never tasted so sweet!


Halloween Candy Bark
Literally takes minutes to make but such fun and really effective. It's Bark is worse than its Bite!

500g Milk Chocolate
50g White Chocolate
Assorted Halloween Candy & Sprinkles

Line a traybake tin with greaseproof paper or a reusable non-stick liner.
Melt the milk chocolate in the microwave or over a bain marie. Pour and spread it evenly over the base of the lined tin.
Melt the white chocolate and drizzle and splash it randomly over the top of the milk chocolate base.
Push all of your Halloween sweets firmly into the chocolate and scatter over the sprinkles.
Pop the bark in the fridge until set and then chop into random shaped pieces.


If you want to get ahead of the game with your Christmas prep be sure to check out my recipe for Candy Cane Bark.


♥ Pin me for later...

www.foodiequine.co.uk Spooky Halloween Chocolate Candy Bark. This no bake treat literally takes minutes to make but is such fun and really effective. Perfect for Trick or Treaters - It's Bark is worse than its Bite!

Halloween Peanut Butter Ghosts

Monday, 17 October 2016
Spooky but Cute, these Ghostly no bake treats are perfect for Halloween. Featuring peanut butter, white chocolate and edible eyes they are ideal for Halloween Parties and Trick or Treat.


Halloween is one of my favourite holidays when it comes to getting crafty with food and drink, it is second only to Christmas in this respect. There is just so much to play with in terms of ghosts, pumpkins, witches and wizards, guts and gore. Admittedly I'm a bit nostalgic for the Scottish Halloween of my youth with guising, neeps and well rehearsed turns. Not sure that trick or treat, pumpkins and a knock knock joke quite cuts it. However pumpkins are definitely easier to carve than neeps and their burning flesh smells much better so it's not all bad. As well as giving us Trick & Treat and Pumpkins, the US of A has also given us SKIPPY Peanut Butter. I absolutely bloomin' LOVE the stuff and simply can not get enough of it. Their Extra Crunchy Super Crunch is my personal preference over the Smooth variant and despite not having a particularly sweet tooth I can't resit a PB desert, milkshake, cake or cookie. Check out my recipes for Peanut Butter Ice Lollies, Peanut Butter Oreo Milkshake and Peanut Butter Oatmeal Cookies


SKIPPY® is the iconic Peanut Butter brand who have been manufacturing in the USA since 1932. They challenged me to come up with a Halloween sweet treat incorporating their authentic American Peanut Butter as part of the 'SPOOKtacular SKIPPY Bake Off'. The recipe below is a no bake treat that would be perfect to make with kids. My daughter reckoned that the ghosts are friendly, like Casper or the Pac Man ones rather than scary Harry Potter Dementors. I tend to agree with her and depending on how you position their eyes and how the chocolate sets they can take on different expressions and personalities. If you can't track down any edible eyes they could be substituted with chocolate drops or small sweets. 


The recipe is based on my recollections of a childhood treat that I remember my Great Aunt Nellie serving up. I reckon Peanut Butter must have been a pretty exotic ingredient in Scotland in the late 1970's and early 1980's! Her recipe specified the ingredients in Cups which makes me wonder if like SKIPPY it also hailed from the USA? By using orange chocolate or candy melts you could transform them into Halloween Pumpkins, and for all year round Peanut Butter treats simply roll into balls and fully or partly cover in your preference of white, milk or dark chocolate. But for now, I ain't afraid of no ghosts! 


Halloween Peanut Butter Ghosts 
Makes approx 25 

Ingredients 
340g Skippy Peanut Butter Crunchy 
100g Crunchy Nut or Regular Cornflakes 
150g Icing Sugar - sieved 
25g Butter, softened 
300g White Chocolate 
Edible Eyes 

Put the Skippy Peanut Butter, cornflakes and softened butter into a bowl and sieve in the icing sugar. 
Mix until thoroughly combined, you may find it easier to use your hands. 
Cool in the fridge for 30 minutes before shaping into approximately 25 small balls the size of a walnut. 
Place on a baking tray topped with greaseproof paper or a reusable non-stick liner and return to the fridge for a further 30 minutes. 
Break up the white chocolate into a bowl and melt in the microwave or over a bain-marie. 
Remove the peanut balls from the fridge and shape them into 'ghostly blobs' and space out well. 
Spoon over the white chocolate until the peanut mix is completely covered, allowing some to drip down to form an ectoplasm base! 
Once the chocolate is starting to set press two edible eyes into each ghost. 
Return to the fridge to chill before serving.


Some of my food blogger friends have also been whipping up spooky Halloween treats. Check out Diana's oh so cute Halloween Peanut Butter Cupcakes complete with spiders and spiderwebs and Elizabeth's spectacular spooktacular Chocolate Peanut Butter Swirl Halloween Cake.


♥ Pin me for later...

www.foodiequine.co.uk Spooky but Cute, these Ghostly no bake treats are perfect for Halloween. Featuring peanut butter, white chocolate and edible eyes they are ideal for Halloween Parties and Trick or Treat.

Have you spotted my spooky seasonal logo on my social media accounts? As always designed by the wonderful www.mimihammill.com


Disclosure : This is a commissioned recipe for SKIPPY. As always, all views expressed are my own. 
Thank you for supporting the brands who make it possible for me to continue to share my Edible Scottish Adventures with you.

Traditional Homemade Toffee Apples

Thursday, 13 October 2016
Perfect for Halloween and Bonfire Night these traditional homemade Toffee Apples will be perfect thanks to the Thermapen digital thermometer.


Halloween and Bonfire Night just aren't complete without traditional toffee apples loved by both little and big kids. Rather than buy the highly coloured bright red versions from the supermarket why not try making your own this autumn? When it comes to any kind of hot sugar work the tricky bit is getting your boiling temperature right. Whether you're looking for thread, soft ball, firm ball or soft crack, things can easily turn to burnt sugar if you're not careful. Time for my trusty Thermapen to once again come into it's own. It's an absolute kitchen essential as far as I'm concerned. British made, the Thermapen is probably the worlds fastest reading kitchen thermometer. The true temperature of a foodstuff can be tested in just three seconds. In addition to ensuring that the toffee on your apple will be crunchy it will also take the guesswork out of other areas of your cooking. Steak will be perfect, your fudge, will set, your jam won't run off your toast, your chocolate will be shiny and tempered and your BBQ won't give anyone an upset tummy.


For toffee apples the magic number you're looking for is 150c which is the hard crack stage. The Thermapen takes only 3 seconds to give an accurate reading and it's temperature display automatically rotates through 360 degrees so you can see it at any angle. There's even a back light which is triggered in dim light whilst a motion-sensing sleep mode automatically turns on/off when set down or picked up. No wonder it's one of my most regularly used and invaluable pieces of kitchen kit. I recently gave my Mum one as I couldn't cope cooking without it when visiting her! 


When it comes to colour the traditional toffee or candy apple is bright red from goodness knows what food colouring. I used Jazz apples which are a wonderful mix of red and green and their colour shines through from the light caramel colour of the 'toffee'. The variety is a cross between the UK's two biggest sellers – the Royal Gala and the Braeburn. I also experimented in adding colour by way of beetroot powder but had mixed success, as whilst it looked brilliant red at the start of cooking it turned to a rather dark brown as the mixture came up to temperature. So my recommendation would be to avoid any artificial colour in your toffee and go for a beautiful coloured fruit instead. 


Traditional Homemade Toffee Apples 
As a child I always thought that a toffee apple was the perfect sweet, as once you'd eaten the toffee the apple would clean your teeth! 

Ingredients 
6 Apples (I used Jazz Apples) 
400g Caster Sugar 
1 Tsp Vinegar 
50g Salted Butter 
100ml Water 
4 Tbsp Golden Syrup 

You will also need 
6 lolly sticks 
Thermapen digital food thermometer 

Wash and dry the apples. Remove any stalks and use a skewer to make a hole from the stalk end, then securely push in a lolly stick. 
Set the apples aside on a baking tray topped with greaseproof paper or a reusable non-stick liner. 
Place the sugar, vinegar, butter, water, and syrup in a heavy based pan and gently dissolve over a low heat. 
Turn up the heat and boil WITHOUT STIRRING (otherwise the sugar may crystallise) until the mixture reaches a reading of 150°C on a Thermapen thermometer. 

TIP - whilst boiling have a small bowl of cold water and a pastry brush to had and use the wet brush to wash down any stray sugar from the sides of the pan. 

Remove the pan from the heat and let the bubbles die down a little. 
Tilt the pan and carefully dip the apples one at a time into the toffee, twirling them to ensure they are fully covered. 
Let any excess toffee drop off before placing them back the lined baking tray. 
Once set store in a cool place - not the fridge - and eat within 48 hours (otherwise the toffee will start to soften and liquify. 


Do take a peek at the three recipes I've previously developed in conjunction with Thermapen which highlight its versatility: 

Disclosure : This is a commissioned recipe for Electronic Temperature Instruments Ltd As always, all views expressed are my own.
Thank you for supporting the brands who make it possible for me to continue to share my Edible Scottish Adventures with you.
Foodie Quine. Design by Mimi Hammill. Powered by Blogger.